My parents had driven out to CO in 2010 to visit and kindly brought all my junk to give me. This junk remained in boxes, unopened and blissfully ignored until recently. We were moving, and I had to decide what was and was not going with us.
So down to our garage I went to sort through those boxes that had been taunting me for 2 years.
I found among other things: my art portfolio from 2nd grade, boxes of letters I had kept, a paper-mache school project from my elem ed college days, books and binders galore, cassette tapes, shoeboxes filled with pictures (before digital, I of course developed every single picture taken on every disposable camera I had since teenagehood.)
My sentiment apparently used to outweigh my practicality. For instance, I found my English Lit binder from high school that I had kept as a momento of my favorite subject. I must have thought that one day I may want to curl up and re-read my essays and that Shakespeare paper from 11th grade??
Into the trash bag. I heard the binder calling out to me, "et tu, Brute?"
And what am I going to do with those childhood swim team trophies? Display them on my mantle? Into the trash bag.
After designating a pile for trash and a pile for Goodwill, I was left with a modest amount of keep-worthy items: yearbooks, a few photo albums, some books, and that art portfolio.
Now the big stuff - Matt and I sold and donated furniture that we would not have room to use or store in "Our Little Tree House" apartment in our new city. One of our pieces that we bid adieu to was our bedframe. I loved it but knew it wouldn't work with our new room dimensions.
When we arrived in KC, we had a few weeks to settle and set up our new nest before Matt started school and I started work.
Which leads me to a segment I like to call:
Decorating on a dime
Three little letters that make a big difference - diy.
After I got over my initial "I can't do that" thinking, I attempted to tackle my first big diy project:
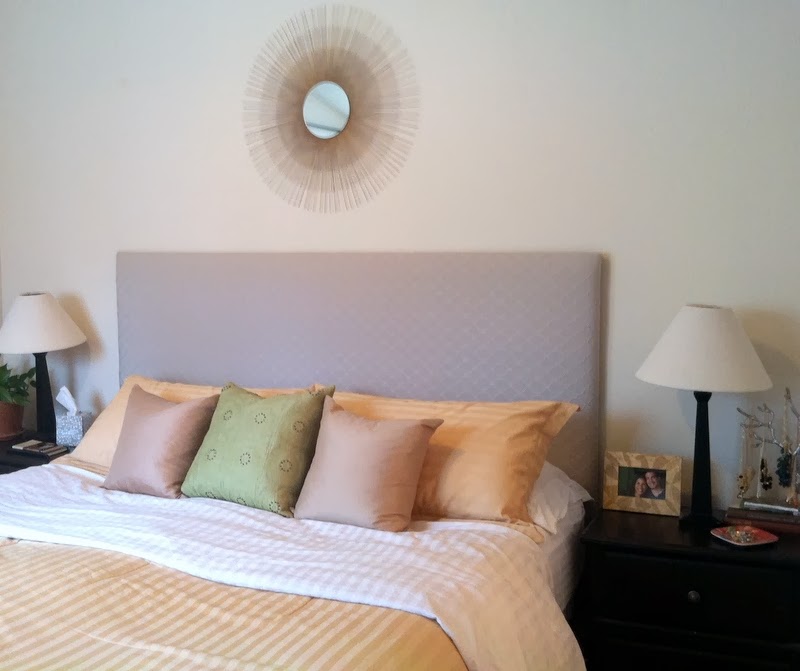
Making a headboard
Two appealing reasons that helped me conquer my fear: It's cheap. And it doesn't take up valuable floor space.
Bonus reason: After searching the web and watching various youtube videos, I found that it's surprisingly not complicated, which really is great news.
Supplies:
* I got the foam padding, batting, and fabric to be cut a couple inches larger than the plywood so that they could wrap around the plywood. About 84"x52" each.
Process:
- Spray one side of upright plywood with adhesive. Press foam padding on with a couple inches hanging off each side.
- Lay plywood flat (with help) onto foam padding and, pulling taut, staple foam padding to back of plywood along each side and corner with staple gun. Be generous with staples.
- Repeat same process with batting: position it against foam-covered wood, pull taut and staple around the back.
- Finally, cover with fabric, pulling taut, stapling to backside of wood. Make sure corners are folded down smoothly.
Here I am in process, getting acquainted with the staple gun. Pardon the unsightly strap.

The finished product:


I felt priit-ty handy and proud of myself, until I did this a few hours later:


Pride comes before a fall.
Next up:
Homemade art
Art is expensive, so instead, some items already on hand have become our living room art (some photos, an old greeting card, some scrapbook paper - voila!) These Ribba frames were a belated bday present to myself from Ikea (love me some Ikea). Matt says that bday money burns a hole in his pocket. Not me. I like to wait and wait and wait some more until I have decided on something I truly love, even if it's months after my birthday.
Each piece is meaningful to us in some way: anniversary date, first apartment key, picture of our first hike, little painting we picked up on our honeymoon...


Then, one spring day, I happened to be out on the porch again and noticed the cocoon quivering. I brought it inside, and Matt and I watched as before our eyes the most beautiful yellow swallowtail emerged. We actually gasped at its brilliance.
The Good News of Christ came flooding into my mind - How He turns death into life! How he makes all things new! How He miraculously transforms us!
We watched our little butterfly hang upside-down on our orchid plant, drying its wings for 2 HOURS. It was awesome - this word being appropriately used here. I was in true awe.
Then, when it was ready, we released her (him?) out into the wild (off our back porch). We stood, arms wrapped round each other, watching it fly away. We felt like proud parents, sending our baby off to college.
Aaannyway...so that's the story behind our butterfly print.
Tasteful sentiment - 1 point. Clutter sentiment - zero.
Wall decals
These words put me out a mere $6.50. And I love eating our meals literally under this sweet truth.

A couple months ago, when we were looking at moving to KC, I asked the Lord if He would provide us a home that was cozy and safe. And I'm so grateful for what He has provided.
I remember my mom once saying that it's important to be thankful to the Lord for what He provides and that discontentment or lack of thankfulness is equivalent to telling Him, "what You have provided is not good enough for me." I shudder to think about having that attitude before my God. When I consciously look through the lens of genuine gratefulness for anything He gives me- big or small-, I find that I enjoy His provision and gifts even more.
So there's a peek into "Our Little Tree House."
You are a brilliant decorater and storyteller, Liane. Good work DIYing! What an inspiration :)
ReplyDeleteAnother blog to love and make me miss you. Thanks. :)
ReplyDeleteI love the headboard and frames! Where did you find the diy headboard instructions? and seriously, who doesn't love ikea?
ReplyDelete